Learn how to seamlessly add Google Analytics to your WordPress site with this comprehensive guide. From setup to advanced tracking, discover actionable steps, tools, and tips to optimize your website’s performance and make data-driven decisions.
Every individual who manages a website understands the critical need for data. Without data, you are essentially flying blind, making guesses about what works and what doesn’t. Everyone handling a website should have Google Analytics installed. It gives you intelligent and actionable analytics that let you clearly see where you need to focus your efforts. For WordPress users specifically, the process of getting Google Analytics set up may seem complex when you first look at it; however, it’s pretty simple if you know the right steps to follow.
This extensive guide will walk you through how to connect Google Analytics to WordPress without needing to be a tech geek. By the end of this article, you’ll have learned how to track your visitors, decipher their habits, and use that information to drastically improve your site’s performance. Whether you are a blogger, a small business owner, or an eCommerce giant, adding Google Analytics to WordPress is the single most impactful step you can take toward digital success.
Why Google Analytics is Essential for WordPress Websites
Before we dive into the technical “how-to,” it is vital to understand the “why.” Why is connecting Google Analytics to WordPress so crucial? Google Analytics is not just a counter of hits; it is a sophisticated data processing tool that helps you answer the most important questions about your digital presence.
When you successfully link Google Analytics to WordPress, you gain the ability to answer questions such as:
- Where are your visitors coming from? Are they finding you through search engines, social media, or direct links?
- Which pages are they spending the most time on? Do they love your long-form guides but ignore your product pages?
- What content drives the most conversions? Which specific blog post turns a reader into a buyer?
- What is the demographic breakdown of your audience? Are you reaching the age groups and locations you intended?
With this treasure trove of data at your fingertips, you can:
- Optimize your site to improve user experience. If you see a high bounce rate on mobile, you know you need to fix your mobile responsiveness.
- Adjust your SEO strategy to attract more organic traffic. By seeing which keywords bring in traffic, you can double down on what works.
- Create content that resonates with your audience. Stop writing about topics no one reads and focus on high-performing subjects.
Connecting Google Analytics to WordPress transforms your website from a static brochure into a dynamic, data-driven marketing machine.
Prerequisites for Adding Google Analytics to WordPress
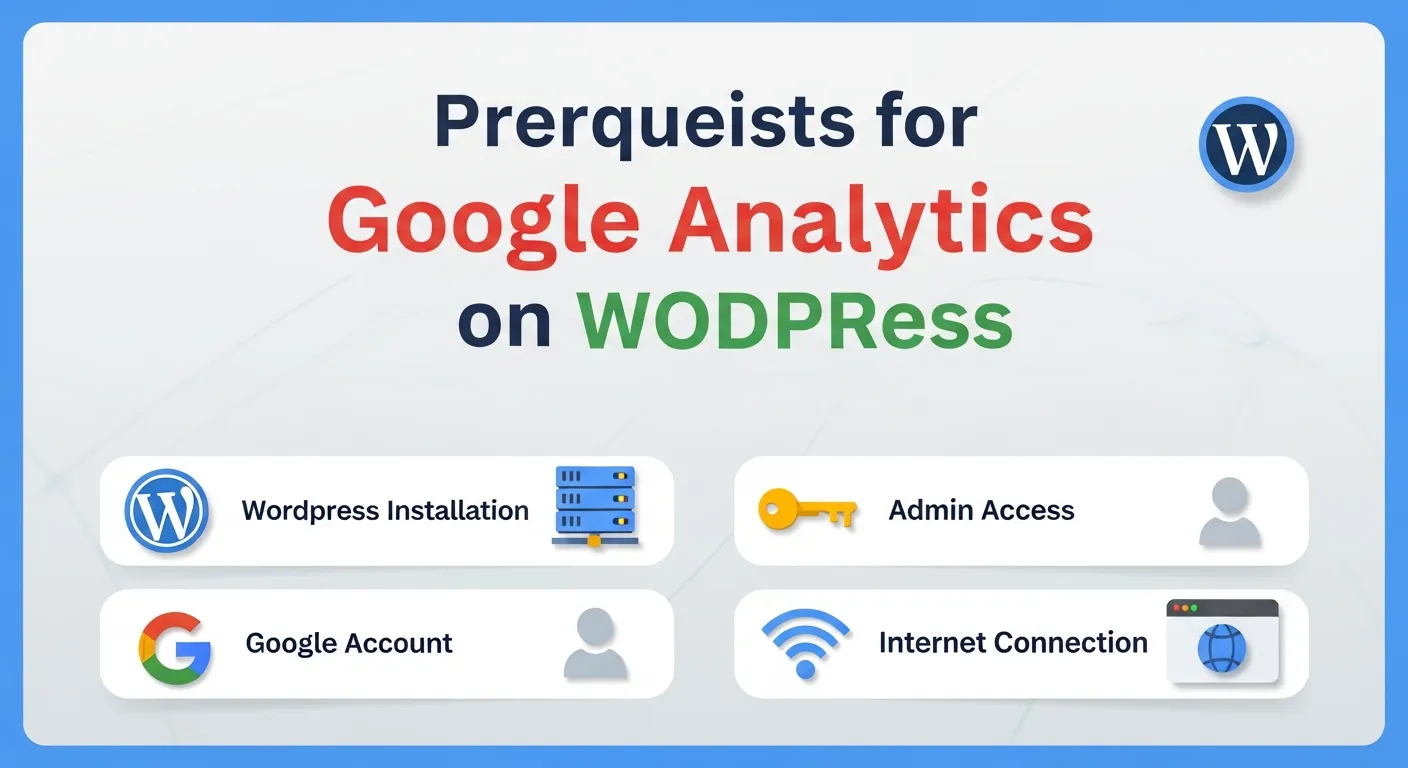
To ensure a smooth installation process when you add Google Analytics to WordPress, there are a few things you need to have in place. Getting organized before you start will save you time and potential frustration.
To add Google Analytics to your WordPress site effectively, you should have:
- A Google Account: You will need this to access the Google Analytics platform. If you use Gmail, Google Drive, or YouTube, you already have one. If not, creating one is free and takes seconds.
- A WordPress Website: Ensure you have full administrator access to your site. You need permission to install plugins or edit theme files. This guide assumes you are using a self-hosted WordPress.org site, not the limited WordPress.com version (unless you are on the Business plan).
- Basic Understanding of Plugins: You will likely use a plugin to simplify the integration process. Don’t worry; we will explain everything step by step, but knowing how to navigate to the “Plugins” section of your dashboard is helpful.
Once you have these prerequisites checked off, you are ready to make Google Analytics work on your site.
Step-by-Step Guide to Add Google Analytics to WordPress
This section is the core of our guide. We will break down the process of connecting Google Analytics to WordPress into manageable chunks. Even if you have never touched a line of code in your life, you will be able to follow along.
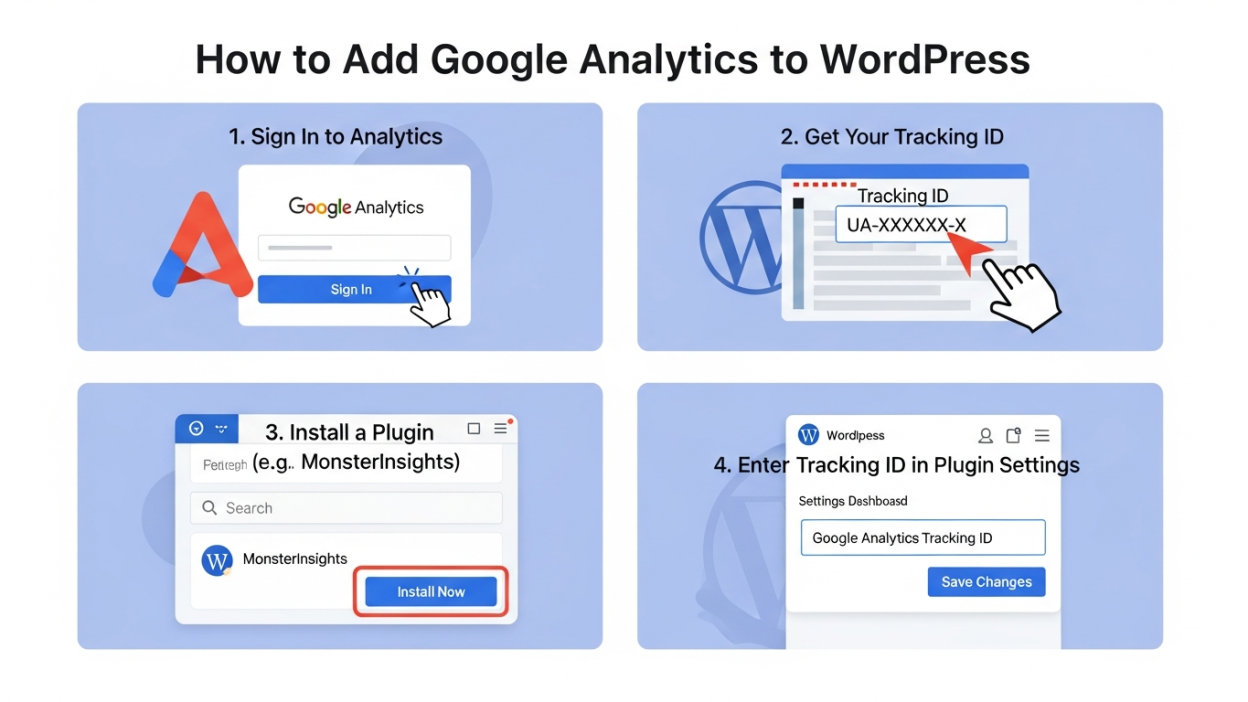
1. Create Your Google Analytics Account
The first step in connecting Google Analytics to WordPress is actually outside of your website. You need to set up your account with Google.
If you don’t already have a Google Analytics account, follow these detailed steps:
- Navigate to the Platform: Go to the Google Analytics website.
- Initiate Signup: Click on the “Get started today” or “Sign Up for Free” button. You will be prompted to log in with your Google Account.
- Account Setup: Enter a name for your account. This is usually your business name (e.g., “Joe’s Coffee Shop”).
- Data Sharing Settings: You will see checkboxes regarding data sharing with Google. Review these and check or uncheck them based on your privacy preferences.
- Property Setup :Enter the name of your website (e.g., “Joe’s Coffee Blog”).
- Time Zone and Currency: Choose the reporting time zone and currency that match your business operations. This is crucial for accurate daily reporting.
- Business Details: Google may ask for some details about your industry and business size. This helps them benchmark your data against others in your sector.
- Agreements: Review the Google Analytics Terms of Service and accept them.
Congratulations! You have now gained access to your Google Analytics dashboard. You have completed the first major phase of adding Google Analytics to WordPress.
2. Add Your Website to Google Analytics
Now that you have an account, the next step in linking Google Analytics to WordPress is telling Google about your specific website. This is done by creating a “Data Stream.”
- Access Admin Settings: From your new Google Analytics dashboard, look for the gear icon labeled “Admin” in the lower-left corner.
- Create a Data Stream: In the Property column (usually the second column), click on Data Streams. Since we are connecting a website, select Web.
- Configure the Stream:
- Website URL: Enter your website’s address (e.g.,
www.yoursite.com). Be sure to select the correct protocol (http:// or https://). - Stream Name: Give your stream a recognizable name, like “Main Website” or “My Blog.”
- Website URL: Enter your website’s address (e.g.,
- Enhanced Measurement: Google Analytics 4 (GA4) automatically enables “Enhanced Measurement,” which tracks scrolls, outbound clicks, and video engagement. It is highly recommended to leave this on.
- Get Your Codes: Click “Create Stream.” Google will now generate a Measurement ID (it looks like
G-XXXXXXX) and a Global Site Tag (gtag.js) code block.
Crucial Step: Keep this browser tab open or copy your Measurement ID to a safe place. You will need this specifically to connect Google Analytics to WordPress in the next steps.
3. Install the Google Analytics Plugin on WordPress
While you can add code manually to your theme’s header file, it is generally risky for beginners. If you update your theme, you might lose the tracking code. Therefore, using a plugin is the safest and most efficient way to add Google Analytics to WordPress.
WordPress plugins make it much easier to connect your site with Google Analytics without touching code.
- Login to WordPress: Go to your WordPress admin dashboard (usually
yourdomain.com/wp-admin). - Navigate to Plugins: On the left-hand sidebar, hover over Plugins and click Add New.
- Search for a Plugin: In the search bar at the top right, type “Google Analytics.” You will see several popular options.
- Site Kit by Google: The official plugin from Google. It connects Search Console, AdSense, and Analytics in one place.
- MonsterInsights: One of the most popular and user-friendly analytics plugins available.
- GA Google Analytics: A lightweight plugin for those who just want to insert the code without extra dashboard widgets.
- Install and Activate: For this guide, we will assume you are using a user-friendly option like MonsterInsights or Site Kit. Click Install Now next to your chosen plugin, and then click Activate.
These plugins are beginner-friendly and will guide you through syncing Google Analytics with your WordPress site seamlessly.
4. Configure the Plugin with Your Google Analytics Code
Now it’s time to bridge the gap and finally connect Google Analytics to WordPress using the plugin you just installed.
Using MonsterInsights:
- Launch Wizard: Upon activation, MonsterInsights usually launches a setup wizard. If not, go to Insights > Settings and click “Launch Setup Wizard.”
- Categorize Your Site: Select whether your site is a Business Website, Blog, or Ecommerce store.
- Connect MonsterInsights: Click the button that says “Connect MonsterInsights.”
- Google Authentication: You will be redirected to a Google login page. Sign in with the Google account you used to create your Analytics account in Step 1.
- Permissions: Grant MonsterInsights the necessary permissions to access your analytics data.
- Select Profile: You will see a list of Google Analytics properties associated with your account. Select the property you created in Step 2.
- Finalize: The plugin will automatically add the necessary tracking code (your Measurement ID) to your site.
Using Site Kit by Google:
- Start Setup: You will see a banner at the top of your dashboard prompting you to start setup. Click Start Setup.
- Verify Ownership: Site Kit will ask you to sign in with Google to verify that you own the website.
- Allow Access: Grant the necessary permissions.
- Set Up Search Console: Site Kit will automatically set up Google Search Console for you if you haven’t already (a huge bonus!).
- Connect Analytics: Once returned to the WordPress dashboard, go to Site Kit > Settings > Connect More Services and select Analytics. Choose your property from the dropdown menu.
Your integration regarding Google Analytics to WordPress is now complete! Google Analytics will start tracking your visitors immediately.
Verifying That Google Analytics is Tracking Your Site
You have technically finished the process to add Google Analytics to WordPress, but you should never assume it is working without proof.
To ensure everything is set up correctly, you can verify the tracking:
- Open Realtime View: Go back to your Google Analytics dashboard. In the left sidebar, click on Reports, then Realtime.
- Visit Your Site: Open a new browser window, or better yet, use an Incognito/Private window, and visit your WordPress website. Navigate to a few different pages.
- Watch the Dashboard: Switch back to the Google Analytics tab. If the setup is correct, you should see at least one active user (you) on the site right now. It will show your location and the page you are viewing.
If you don’t see any activity after a minute or two, double-check your plugin configuration and ensure the proper tracking ID is in place. Sometimes caching plugins can delay the code from appearing, so clear your WordPress cache if necessary.
Mastering Mobile Analytics Integration

In the modern digital landscape, simply having Google Analytics installed isn’t enough; you must understand how mobile users interact with your WordPress site. Mobile traffic now accounts for over half of all global web traffic, making mobile data analysis critical for success when you add Google Analytics to WordPress.
When you integrate Google Analytics to WordPress, you gain access to specific “Tech” reports that break down your audience by device category (desktop, mobile, tablet). However, optimizing for mobile goes beyond just looking at these numbers. You need to ensure your marketing stack is mobile-ready.
Key Points for Mobile Optimization Tracking:
- Mobile Bounce Rate: Watch this metric closely in Google Analytics. A high mobile bounce rate usually indicates your WordPress theme isn’t responsive enough or loads too slowly on cellular networks.
- Cross-Device Tracking: Google Analytics 4 (GA4) is excellent at tracking users across devices. Ensure you have “Google Signals” activated in your Analytics settings to get better data on users who switch from phone to desktop.
- App Integration: If your WordPress site has a companion mobile app, you need a unified view of your data.
To truly excel in the mobile sphere, you need tools that complement your analytics. For instance, creating mobile-friendly graphics and marketing materials is essential to keep those mobile users engaged once they land on your site. You can explore tools that help bridge the gap between design and data, such as mobile marketing apps like Canva, which can help visualize your data or create assets that perform better on mobile screens based on your analytics findings. By using such tools alongside your Google Analytics to WordPress setup, you create a cohesive ecosystem where design is informed by data.
|
Metric |
Desktop Benchmark |
Mobile Benchmark |
Action Required if Below Benchmark |
|---|---|---|---|
|
Bounce Rate |
40-50% |
50-60% |
Optimize page load speed and mobile menu navigation. |
|
Session Duration |
3-4 minutes |
1-2 minutes |
Make content scannable and use larger fonts. |
|
Conversion Rate |
2-3% |
1-1.5% |
Simplify checkout forms and use mobile wallets (Apple Pay/Google Pay). |
Advanced Tracking for Marketing Success
Once you have successfully navigated the process to connect Google Analytics to WordPress, you will want to move past the basic “pageview” metrics. The real power of analytics lies in tracking specific marketing campaigns and user interactions that lead to revenue. This is where advanced configuration comes into play.
Marketing success relies on attribution—knowing exactly which link, ad, or email caused a user to buy or subscribe. Google Analytics allows you to use UTM parameters (special tags added to the end of your URLs) to track these campaigns precisely. When you add Google Analytics to WordPress, the system automatically captures these UTM parameters.
Strategies for Marketing Analytics:
- Event Tracking: Set up custom events for button clicks, video plays, or file downloads. This tells you what users do, not just what they see.
- Goal Conversion: Define what a “success” looks like. Is it a “Thank You” page visit? A duration of 5 minutes? Configuring these goals is essential.
- Audience Segmentation: create segments for “Returning Visitors” vs. “New Visitors” to see how differently they behave.
To deeply understand how to leverage these advanced features, you must commit to continuous learning. There are excellent resources available that dive deep into interpreting complex data sets. For example, you can read about mastering Google Analytics for marketing success to get a broader perspective on how top-tier marketers utilize the data you are now collecting. Integrating these advanced strategies ensures that your effort to add Google Analytics to WordPress yields a high return on investment.
Affiliate Marketing and Analytics Integration

For many WordPress users, the ultimate goal of their website is to generate revenue through affiliate marketing. If this is your business model, the way you use Google Analytics to WordPress data will differ significantly from a standard blogger. You aren’t just looking for traffic; you are looking for clicks on affiliate links.
Standard Google Analytics setups do not automatically track clicks on external links (links that leave your site). Since affiliate links are external, you need to configure “Outbound Link Tracking.” Most modern Google Analytics plugins for WordPress handle this automatically, but you must verify that it is active.
Essential Affiliate Metrics to Track:
- Top Affiliate Pages: Identify which blog posts generate the most clicks to Amazon or other partners.
- Click-Through Rate (CTR): Calculate the percentage of visitors on a page who actually click your affiliate link.
- Referral Sources: Which traffic sources (Pinterest, Google Search, Facebook) bring in users who are most likely to click affiliate links?
To maximize your earnings, you should combine your analytics data with specialized affiliate plugins. These tools can cloak your ugly affiliate links, manage them centrally, and even provide their own layer of click tracking. There are numerous options available, so it is wise to research the best affiliate marketing plugins for WordPress to find one that integrates smoothly with your new Google Analytics setup. By combining a robust affiliate plugin with the insights from Google Analytics to WordPress, you can scientifically optimize your income streams.
Unlock the Power of Data
Connecting Google Analytics to WordPress is merely the first step to uncovering useful insights. It is the foundation upon which you build your digital empire. With the help of this tool, you are able to learn more about your audience, bring your content strategy to the next level, and increase your website visibility and impact.
The integration of Google Analytics to WordPress allows you to see the reality of your website’s performance, stripped of ego and guesswork. It reveals harsh truths (like a blog post nobody reads) and exciting opportunities (like a sudden spike in traffic from a specific city).
Ready to get control of how your website performs? Begin to search your Google Analytics dashboard immediately and study these numbers in order to make your next move. Don’t just collect data; act on it. If a page is performing well, write more like it. If a traffic source is drying up, investigate why.
For more tips on improving your WordPress website and mastering the art of the Google Analytics to WordPress connection, keep coming back to our blog for the latest news, tools, and expert resources.
Frequently Asked Questions (FAQ)
1. Is Google Analytics free to use for my WordPress site?
Yes, Google Analytics is completely free for the vast majority of users. There is a premium version called Analytics 360, but it is designed for large enterprises with massive data needs. For small to medium businesses and personal blogs, the free version provides more than enough power to track your Google Analytics to WordPress data effectively.
2. Can I use Google Analytics without a plugin on WordPress?
Absolutely. You can manually insert the tracking code provided by Google into your theme’s header.php file. However, this method is generally not recommended for beginners because if you update your theme, the code will be overwritten and lost. Plugins offer a safer, persistent way to maintain the Google Analytics to WordPress connection.
3. Will adding Google Analytics slow down my website?
Google Analytics uses an asynchronous script, meaning it loads in the background while the rest of your page loads. Therefore, it has a negligible impact on your site speed. However, using poorly coded plugins to insert the script can cause slowdowns. Always choose reputable plugins to ensure your Google Analytics to WordPress integration remains lightweight and fast.
4. How do I filter out my own visits from the data?
This is a critical step for accurate data. In Google Analytics, you can set up an “Internal Traffic” filter. You will need to find your IP address (search “what is my IP” on Google) and then configure a filter in the Admin settings of Google Analytics to exclude traffic from that specific IP address. This ensures your testing doesn’t skew your Google Analytics to WordPress reports.
5. What is the difference between Universal Analytics and Google Analytics 4 (GA4)?
Universal Analytics (UA) was the previous standard, a session-based model of tracking. Google Analytics 4 (GA4) is the current standard, which uses an event-based model. GA4 is more privacy-centric and works better across different devices. When you add Google Analytics to WordPress today, you should focus entirely on GA4, as UA has been deprecated.
6. How can analytics help me grow my business strategy?
Analytics provides the objective evidence needed to make strategic decisions. Instead of guessing what your customers want, you can see exactly what they are searching for and buying. By analyzing user flow and conversion paths, you can identify bottlenecks in your sales funnel. For a deeper understanding of how data informs corporate planning, you can explore concepts related to business analytics growth strategy to see how enterprise-level principles apply to your site.
7. Why is my bounce rate so high?
A high bounce rate means users are landing on a page and leaving without interacting. This could be due to slow loading times, misleading content (clickbait), or poor design. However, on a blog, a high bounce rate is sometimes normal because users come, read the article, and leave satisfied. Context is key when interpreting Google Analytics to WordPress data.
8. Can I track e-commerce sales with Google Analytics?
Yes, but it requires extra setup. If you use WooCommerce, plugins like MonsterInsights or the WooCommerce Google Analytics integration plugin can automatically pass purchase data to Google. This allows you to see revenue, tax, and shipping costs directly in your analytics dashboard. This adds a layer of financial depth to your Google Analytics to WordPress integration.
9. How long does it take to become an expert at analyzing data?
Learning the interface takes a few days, but mastering the interpretation of data is a lifelong journey. It requires not just technical skill, but critical thinking to understand why the numbers are what they are. This cumulative knowledge is often referred to as the power of analytical experience, where years of observing patterns allow you to predict future trends with high accuracy.
10. Do I need to know technical concepts like chemistry or coding to use Analytics?
You do not need to know coding or advanced sciences. While data analysis shares the rigorous methodology found in sciences—similar to what is the analytical chemistry approach of breaking down substances to understand them—marketing analytics is much more accessible. You are breaking down traffic sources rather than chemical compounds, but the mindset of detailed observation remains the same. The tools available today make the Google Analytics to WordPress process accessible to everyone.